


Table of contents
- Why Choose More Than <div> Everywhere?
- Keeping It Neat with React Fragments
- Elevating Headers with <header> Tags
- Navigating Using <nav> Tags
- The Final Touch: Transforming Websites with <footer> Tags
- Organizing Content with Precision: <section> Tags
- Adding Depth with <aside> Tags
- Small Changes, Big Impact: The <span> Touch
Hey folks, in this blog post, we're going to learn something that will help you transition from being a beginner React developer to a professional one. It's not about learning something new, it's about focusing on the basics that many people tend to ignore or not consider important on their development journey. In this blog post, we'll take a look at some semantic HTML tags that we should use if we want to become a professional React developer. Additionally, we'll also look into those wrong practices that we shouldn't follow.
Why Choose More Than <div> Everywhere?
We're all guilty of using the <div> tag everywhere, whether it's for styling an element or putting the whole page in a container. But the question is, is this okay? Honestly, it's not entirely wrong. No one's stopping you, and your website will probably work just fine. But should you do it? Well, that's a different story.
There are several reasons for this. First, when someone reviews your code, they might not understand what's what because your entire HTML might be filled with <div> tags. This isn't great for SEO either because the <div> tag doesn't provide any specific meaning that search engine bots can use. So, what should we do?
We don't really need to do much. HTML has already made our lives easier. It provides us with some tags that have semantic meanings, which are good for SEO and gives our code a professional look overall. So, let's take it step by step and learn about these tags.
Keeping It Neat with React Fragments
In React, both <React.Fragment> and <div> are used to group elements together in JSX. However, there are cases where using <React.Fragment> can be more beneficial than using a <div>, especially when you want to avoid adding unnecessary nodes to the DOM. Here's an example scenario where using <React.Fragment> makes sense:
Suppose you're creating a list of items using a mapping function, and each item should be wrapped in an element for styling purposes, but you don't want to introduce extra <div> elements in the DOM structure. Here's how you could use <React.Fragment> in this situation:
import React from 'react';

const ItemList = ({ items }) => {
  return (
    <ul>
      {items.map(item => (
        <React.Fragment key={item.id}>
          <li>{item.name}</li>
          <li>{item.description}</li>
        </React.Fragment>
      ))}
    </ul>
  );
};
export default ItemList;
Using a <div> in this scenario would result in extra <div> elements wrapping each item's content, potentially affecting the styling or layout of the page. Using <React.Fragment> helps avoid these unnecessary elements while still allowing you to group elements together in the JSX code.
Elevating Headers with <header> Tags
The beginning of our webpage is usually marked by the header, where we place our important navigation menus. But if we just put it in a <div> tag, then what difference will it make between this and the other sections of the page? That's why HTML provides us with the <header> tag, which is specifically used to create the header section in a web app. Here, we usually display our app's logo and navigation menu. But because we're React developers, we're taking it one step further.
Instead of creating a separate header section for each page, we should create a separate component for the header. Then, wherever we want to show the header, we should use that component. This approach allows us to manage our header consistently across different parts of the app.
// Using <header> in a separate component
import React from 'react';

export default function AppHeader() {
return (
<header>
<h1>Your Website Title</h1>
<nav>...</nav>
</header>
);
}
Navigating Using <nav> Tags
The <nav> tag does more than just helping you navigate. Placing this tag within your <header> is a good choice because it assists both people visiting your site and search engines in understanding what your website is all about. It's as if you're putting up a clear signpost that says, "This way to the important things!" This simple decision enhances the overall understanding of your site's structure and content.
// Using <nav> for navigation
<header>
<h1>Your Website Title</h1>
<nav>
<ul>
<li>Home</li>
<li>About</li>
<li>Contact</li>
</ul>
</nav>
</header>
The Final Touch: Transforming Websites with <footer> Tags
Just like how the header is crucial in our website, the footer is equally important. This section is where we provide users with related links, social links, and information about various pages on our website. That's why HTML gives us the <footer> tag – something we should definitely use when creating the footer. But since we're React developers, we should go a step further and create a separate component for the footer. This way, we can reuse it whenever we want.
// Using <footer> in a separate component
import React from 'react';
export default function AppFooter() {
return (
<footer>
<p>© 2023 Your Company</p>
<p>Contact: contact@yourcompany.com</p>
</footer>
);
}
Putting the Focus on Main with <main> Tags
Often, when we create a new page in React, we usually start by making a <div> tag and assigning it a class like "container." That's okay, but there's a way to make it even better. Instead of doing that, we can use the <main> tag. This tag lets us wrap the content of a single page, and the cool thing is, we can do this for every page. Why? Because, in the end, you'll be displaying one page on the screen at a time.
import React from 'react';

export default function HomePage() {
return (
<main>
<section>...</section>
<section>...</section>
<section>...</section>
</main>
);
}
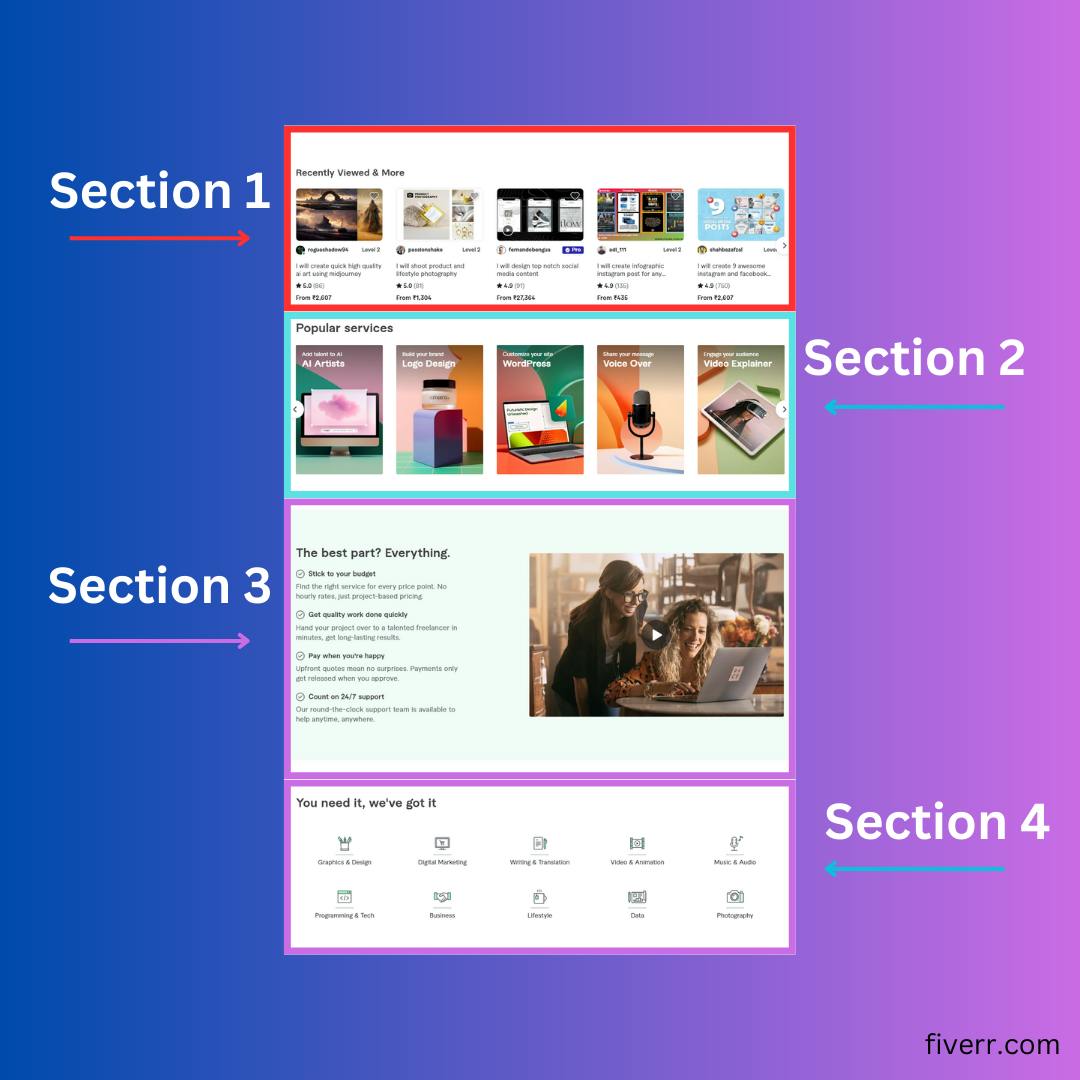
Organizing Content with Precision: <section> Tags
Usually, a webpage is divided into different sections. For example, if we take the example of a portfolio website, there might be a projects section or a contact section, and we use the <div> tag to divide these sections. However, instead of using the <div> tag, we can use the <section> tag. Personally, I find this tag to be the most useful because it gives your code an overall clean look. It's used to mark up a distinct section of content that has its own heading and can be considered a standalone unit. It carries semantic meaning and helps convey the structure and organization of a webpage to browsers.
When to Use <section> Over <div>:
Semantic Clarity: If the content you're grouping together forms a distinct section of your webpage, use
<section>. This adds semantic clarity and communicates to both developers and browsers that the content represents a coherent and standalone unit.SEO: Search engines use semantic HTML elements to understand the content and structure of web pages. Properly using
<section>can contribute to better SEO (Search Engine Optimization) for your website.Structure: If you're marking up content that could be meaningfully divided into multiple sections, each with its own heading, consider using
<section>to convey the hierarchical structure more accurately.Styling: You can style both
<div>and<section>elements, so styling is not a major differentiator. However, if you're using CSS frameworks or other tools that rely on semantic HTML, using<section>might align better with their conventions.
Adding Depth with <aside> Tags
The <aside> tag is typically used to create a sidebar. For example, in an e-commerce website, it can be used to create a filter section, or on a blog site, it can be used to display featured posts. We can also wrap an entire React sidebar component within the <aside> tag.
Small Changes, Big Impact: The <span> Touch
You can use the <span> tag in React when you want to apply styling or target specific parts of your text content. It's useful for making small changes without affecting the overall layout. For instance, if you need to highlight a specific word within a sentence, you can use the <span> tag like this:
// Using <span> for styling
<p>
  Hello, <span style={{ color: 'blue' }}>world</span>! This is a simple example.
</p>
In this example, the word "world" will be displayed in blue text due to the <span> tag's styling. The <span> tag is handy when you want to isolate and style small portions of text without affecting the entire paragraph's layout.
The End!
Apart from these, there are many other available semantic tags. However, most tasks can be accomplished using these tags. But if you want to learn more, you can refer to the MDN documentation for additional information. And if you found this article even slightly helpful, please do consider liking it. And if you wish to connect with a fellow developer like yourself, you can reach out to me on Twitter, where I share my journey in web development.